An activity is a window that contains the user interface of your applications and it’s main aim is to interact with the user. Applications have one or more activities. From the moment an activity appears on the screen to the moment it is hidden, it goes through a number of stages, known as an activity’s life cycle.
An intent enables different activities from different applications to work together ensuring that tasks can be performed as though they all belong to one single application.
To create an activity define a Java class that extends the Activity base class:
package basic.activities;

import android.app.Activity;
import android.os.Bundle;

public class MyfirstProjectActivity extends Activity {
    /** Called when the activity is first created. */
    @Override
    public void onCreate(Bundle savedInstanceState) {
        super.onCreate(savedInstanceState);
        /** Load the UI component using the main.xml file
        /*  defined in res/layout folder */
        setContentView(R.layout.main);
    }
}
Every activity in an application must be declared in AndroidManifest.xml file, like this:
<?xml version="1.0" encoding="utf-8"?>
<manifest xmlns:android="http://schemas.android.com/apk/res/android"
package="basic.activities"
android:versionCode="1"
android:versionName="1.0">
    <uses-sdk android:minSdkVersion="9" />
    <application android:icon="@drawable/icon" android:label="@string/app_name">
        <activity android:name=".MyfirstProjectActivity" android:label="@string/app_name">
            <intent-filter>
                <action android:name="android.intent.action.MAIN" />
                <category android:name="android.intent.category.LAUNCHER" />
            </intent-filter>
        </activity>
    </application>
</manifest>
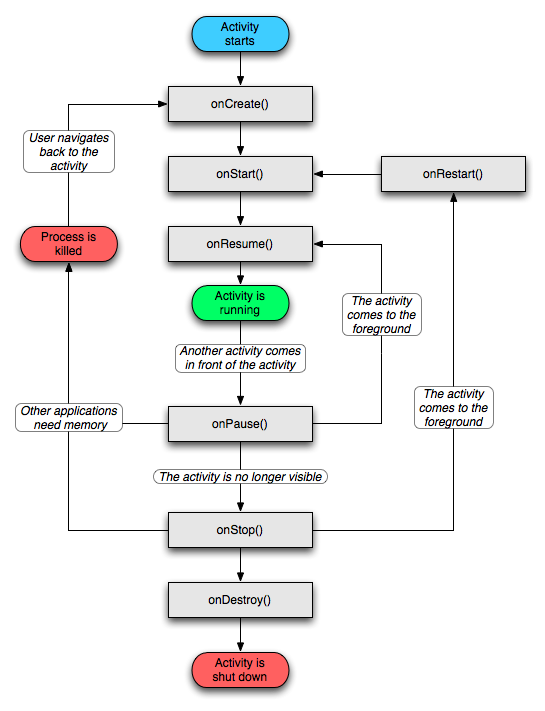
- onCreate — Called when the activity is first created
- onStart() — Called when the activity becomes visible to the user
- onResume() — Called when the activity starts interacting with the user
- onPause() — Called when the current activity is being paused and the previous activity is being resumed
- onStop() — Called when the activity is no longer visible to the user
- onDestroy() — Called before the activity is destroyed by the system (either manually or by the system to conserve memory)
- onRestart() — Called when the activity has been stopped and is restarting again
The life cycle of an activity

Let’s implement the activity various events. In the MainActivity.java file add the new statements:
package basic.activities;

import android.app.Activity;
import android.os.Bundle;
import android.util.Log;

public class MyfirstProjectActivity extends Activity {
	String tag = "Events";
	@Override
	public void onCreate(Bundle savedInstanceState) {
		super.onCreate(savedInstanceState);
		setContentView(R.layout.main);
		Log.d(tag, "Event: onCreate()");
	}
	public void onStart()
	{
		super.onStart();
		Log.d(tag, "Event: onStart()");
	}
	public void onRestart()
	{
		super.onRestart();
		Log.d(tag, "Event: onRestart()");
	}
	public void onResume()
	{
		super.onResume();
		Log.d(tag, "Event: onResume()");
	}
	public void onPause()
	{
		super.onPause();
		Log.d(tag, "Event: onPause()");
	}
	public void onStop()
	{
		super.onStop();
		Log.d(tag, "Event: onStop()");
	}
	public void onDestroy()
	{
		super.onDestroy();
		Log.d(tag, "Event: onDestroy()");
	}
}
Press F11 to load the app on the emulator and switch from Java perspective on Debug perspective.
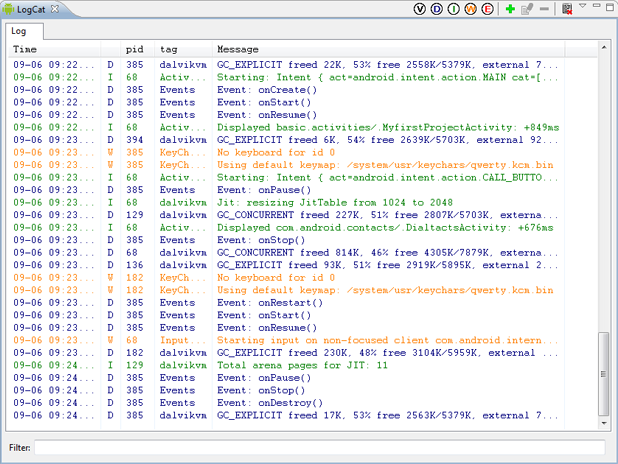
When the activity is first loaded, you should see the following in the LogCat window:09-06 09:22:55.475: DEBUG/Events(385): Event: onCreate()
09-06 09:22:55.475: DEBUG/Events(385): Event: onStart()
09-06 09:22:55.475: DEBUG/Events(385): Event: onResume()
If you now press the back button (Esc key) on the Android Emulator, the following is printed:09-06 09:24:00.365: DEBUG/Events(385): Event: onPause()
09-06 09:24:00.915: DEBUG/Events(385): Event: onStop()
09-06 09:24:00.915: DEBUG/Events(385): Event: onDestroy()
Enter again in your app and observe the following:09-06 09:22:55.475: DEBUG/Events(385): Event: onCreate()
09-06 09:22:55.475: DEBUG/Events(385): Event: onStart()
09-06 09:22:55.475: DEBUG/Events(385): Event: onResume()
Press the Phone button on the Android Emulator so that the activity is pushed to the background:09-06 09:23:05.505: DEBUG/Events(385): Event: onPause()
09-06 09:23:06.665: DEBUG/Events(385): Event: onStop()
Notice that the onDestroy() event is not called, indicating that the activity is still in memory.
Exit the phone dialer by pressing the Back button. The activity is now visible again:09-06 09:23:31.835: DEBUG/Events(385): Event: onRestart()
09-06 09:23:31.835: DEBUG/Events(385): Event: onStart()
09-06 09:23:31.845: DEBUG/Events(385): Event: onResume()

As you can see from this example, an activity is destroyed when you press the Back button. the onPause() event is called in both scenarios — when an activity is sent to the background, as well as when it is killed.
When an activity is started, the onStart() and onResume() events are always called, regardless of whether the activity is restored from the background or newly created.
Style and theme an activity
By default, an activity occupies the entire screen but you can apply a dialog theme to it so that it is displayed as a pop-up. In the AndroidManifest.xml file modify the element by adding the android:theme attribute:
<activity android:name=".MyfirstProjectActivity"
	  android:label="@string/app_name"
	  android:theme="@android:style/Theme.Dialog">
Hiding the activity title
You can hide the title bar of an activity.
import android.view.Window;

public class MyfirstProjectActivity extends Activity {
	@Override
	public void onCreate(Bundle savedInstanceState) {
		super.onCreate(savedInstanceState);
		requestWindowFeature(Window.FEATURE_NO_TITLE);
		setContentView(R.layout.main);
	}

Displaying a dialog window
Using an activity you can display a dialog window to get a confirmation from the user. Add the following statements to the main.xml file:
<Button android:id="@+id/btn_dialog"
	android:layout_width="fill_parent"
	android:layout_height="wrap_content"
	android:text="Click to display a dialog" />
In MyfirstProjectActivity.java file add the following code:
package basic.activities;

import android.app.Activity;
import android.app.AlertDialog;
import android.app.Dialog;
import android.content.DialogInterface;
import android.os.Bundle;
import android.view.View;
import android.widget.Button;
import android.widget.Toast;

public class MyfirstProjectActivity extends Activity {
	CharSequence[] items = { "Option one", "Option two", "Option three" };
	boolean[] itemsChecked = new boolean [items.length];

    /** Called when the activity is first created. */
    @Override
    public void onCreate(Bundle savedInstanceState) {
        super.onCreate(savedInstanceState);
        setContentView(R.layout.main);

        Button btn = (Button) findViewById(R.id.btn_dialog);
        btn.setOnClickListener(new View.OnClickListener() {
            public void onClick(View v) {
                showDialog(0);
            }
        });
    }

    @Override
    protected Dialog onCreateDialog(int id) {
        switch (id) {
        case 0:
        	return new AlertDialog.Builder(this)
        	.setIcon(R.drawable.icon)
            .setTitle("This is a dialog with some simple text...")
            .setPositiveButton("OK", new
                DialogInterface.OnClickListener() {
                public void onClick(DialogInterface dialog, int whichButton)
                {
                	Toast.makeText(getBaseContext(),
                			"OK clicked!",
                			Toast.LENGTH_SHORT).show();
                }
            })
            .setNegativeButton("Cancel", new
                DialogInterface.OnClickListener() {
                public void onClick(DialogInterface dialog, int whichButton)
                {
                	Toast.makeText(getBaseContext(),
                			"Cancel clicked!",
                			Toast.LENGTH_SHORT).show();
                }
            })
            .setMultiChoiceItems(items, itemsChecked, new
                DialogInterface.OnMultiChoiceClickListener() {
					@Override
					public void onClick(DialogInterface dialog,
							int which,
							boolean isChecked) {
					   Toast.makeText(getBaseContext(),
					   items[which] + (isChecked ? " checked!": " unchecked!"),
					   Toast.LENGTH_SHORT).show();
					}
				}
            )
            .create();
        }
        return null;
    }
}
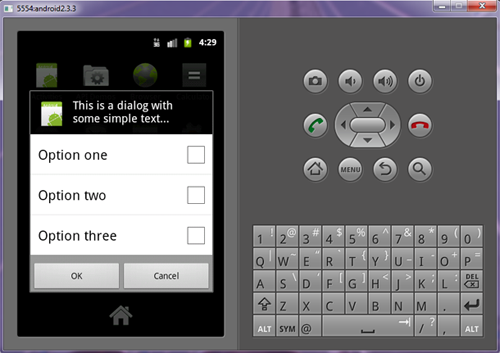
Here’s the output:

The overrided method onCreateDialog() is a callback for creating dialogs that are managed by the activity, they are invoked when you call the showDialog() method.
To create a dialog, you use the AlertDialog class’s Builder constructor to which set various properties (icon, title, buttons, checkboxes, etc).
In Android, you will often encounter the Context class and its instances (used to provide reference to your application). For example, in this example, the first parameter of the Toast class takes in a Context object.
Toast.makeText(getBaseContext(),
     "OK clicked!",
     Toast.LENGTH_SHORT).show();
Because the Toast() class is not used directly in the activity (it is used within the AlertDialog class), you need to return an instance of the Context class by using the getBaseContext() method.


i’ll update it soon for the latest android version
we still have to wait to “move” completely on that. little patience..
check here also: https://developer.android.com/guide/topics/manifest/manifest-intro